TABLE OF CONTENTS
- What is the Financial Aid Plan (FA Plan)?
- Creating the FA Plan
- Draft and Populated Versions of a Document
- The FA Plan Structure
- Populating the Financial Aid Plan
- Creating FA Plan Templates
- Financial Plan PDF Headers
What is the Financial Aid Plan (FA Plan)?
Financial Aid Plan — is the plan of paying for a student's study. It contains the plan of payments that will cover the student's study costs, as well as the received credits, grants, and awards.
Many fields in the FA Plan are populated and calculated automatically when creating or saving a draft. For a full overview, see Financial Aid Plan Automation.
Creating the FA Plan
The FA plan can be created only if the Enrollment Agreement was created.
The FA plan can be created in the student’s profile on the Financial tab. Next, on the Details & Financial Aid Plans tab click the Create Financial Aid Plan link in the corresponding row of a group on the Groups panel:

At the next step, you should select a template that will be used for the FA plan creation. You can select a template in the FA Plan Template field or use the group template in the FA Plan Group Template field. If you do not use the group template, check the Create Without Group Template checkbox. Users that have the corresponding permissions can create the FA plan without using templates:

Draft and Populated Versions of a Document
There are two versions of the financial aid plan:
- Draft — the draft version of a document. This version can be edited and configured. When all the required information is filled in, FA Plan can be saved to the populated version. More information can be found in the following section: Populating the Financial Aid Plan.
- Populated — the final version of a document that is to be signed by the student. This version cannot be edited. If you need to edit it, create a new draft version, change it, and populate it again.
The FA plan can be edited on the Student "Name": Financial Aid Plan page. Use the New Draft button to create a new draft and edit it, or click Show Draft if a draft has been already created:

The FA Plan Structure
The Financial Aid Plan consists of the following:
- The Financial Aid Plan panel — shows the student’s core and prereq groups information; information about credit granted; current FA Plan status (populated, draft); other FA information such as summary financial aid status, verification groups, and FA plan template. Click the Edit button under the panel to begin editing:

- The Populated panel — contains information about the date and the author of the last population. The populated version of the document is the final version of the document verified by users and the system:

- The Draft panel — contains information about the date and the author of the last draft changes:

- Non-Direct Expenses shows information about weekly expenses for Room and Board, Personal Expenses. The weekly payment is used in calculations and is displayed in the FA plan:

- Stafford Loan and PLUS Loan — are the credits that a student may receive to pay for education. These credits can be used to pay any expenses related to education. The FA plan shows information about the sum of the credit, its interest rate, and monthly payments.
- First Time Borrower — is set automatically: the information is taken from ISIR. The First Time Borrower field shows the previously received awards and loans:

Expected Payments — the payments that a student is expected to pay to cover the education expenses. The Due Date column shows the date the expected payments should be paid before. An expected payment becomes a bill (the student receives a payment bill) if the status of EA or of the FA plan with this payment is Populated. Bills are sent in advance within a specified number of days (can be set in Academy Settings) before the Due Date.
The sum in the Original Amount column can be positive or negative as well. The negative bill should not be paid because it is used to adjust the sum of all bills. The paid bills are highlighted in green:
- Charge Adjustments — shows the adjustments for direct educational costs. Add adjustments by clicking the Edit Draft button under the Draft panel and then use the Add Charge Adjustment panel. The adjustment is applied to the charge and adjusts its amount:
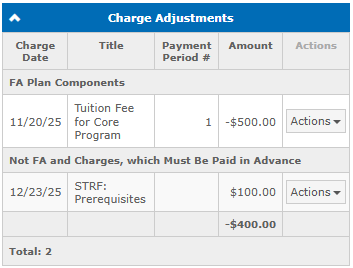
- Not FA Charges — shows Not FA Charges from EA. These charges cannot be deleted from the FA plan:

- The Schedule of Estimated Costs and Payment Arrangements panel is divided into academic years with each year divided into:
- 2 pay periods for programs using semester/trimester credit hour, clock hour, or non-term academic calendar.
- 3 pay periods for programs using quarter credit hour academic calendar.
The panel shows the following:
- Start Date — start date of the pay period.
- End Date — end date of the pay period.
- Number Of Weeks — the duration of the pay period in weeks.
- Enrollment Status — the student’s status in the program (Full-Time, 3/4 time, 1/2 time, less than 1/2 time).

Enrollment Status is calculated depending on the program type and the number of hours the student takes in the program of that pay period. For programs with a credit hour academic calendar, the enrollment status within each pay period will be set to: Full-Time for 12 or more credits, 3/4 for 11.99-9.00 credits, 1/2 for 6.00-8.99, < 1/2 for less than 6. For programs with a clock hour or non-term academic calendar, the status is always Full-Time and the not full academic years amounts of financial aid will be decreased according to the financial aid calculation rules. Hovering over the Enrollment Status will show additional info about the calculation and the status.

- The ISIR Datablock consists of the fields filled from ISIR (the electronic document with all the information about the student that the student provided when filling the financial aid request, FAFSA).

- Direct Educational Costs — Charges for education that the student is to pay for. The charges from EA get here right after creating the FA plan. When charge adjustments are applied, the cells display the adjusted amounts and the total rows reflect those adjusted values.
- Non-Direct Educational Costs — student’s additional expenses for education: Loan Fees, Personal Expenses, Room and Board (Food and Housing), Transportation.
- Cost of Attendance — the sum of all Direct and Non-Direct Educational Costs:

- Estimated Payment by Payment Period — the expected payments, grants, and credits that should cover the education cost. The expected aid amount is entered in the FA plan and when the school receives it in full, the amount is highlighted in green.

- Remaining Need — is the sum that is not covered by financial aid.
Remaining Need = Cost of Attendance - SAI (Student Aid Index) - Awards that do not have the Exclude from Remaining Need Calculation setting enabled (if a component has Gross/Net, only Gross is used).Note: The Exclude from Remaining Need Calculation setting for the components can be checked here: Admin tab → Charges & Payments → Payments. - Expected Cash Payments — the sum of expected payments that are included in the corresponding payment period according to the due date. If the payment date is within the break period, the charge is included in the payment Period preceding the break dates. The amount in that row should match the amount on the Expected Payments panel.
- Unfunded Balance Amount — the part of educational costs that is not covered by awards. Calculated as Direct Educational Costs (Total) — Awards (Total):

Note: There are fields that are calculated automatically and can be edited manually. If the automatically calculated value differs from the manual value, the field will be highlighted in yellow. If the cell is highlighted in green, this means the sum is fully covered.
Populating the Financial Aid Plan
After all required information is added to FA Plan, click Populate below the Draft panel:

During the population, the information entered in the FA plan goes through multiple verifications. For example:
- The student should be in the ACTIVE status.
- The charge date for each charge should not be prior to the current date for more than 5 working days.
- "Direct Educational Costs Total Amount" must be equal to the amount from the corresponding rows in EA.
- "Total Amount" from EA must be greater or equal to "Total from Awards" + "Total Expected Payments".
If the information is entered correctly, the document becomes populated after confirmation.
If there are errors, the system will show a notification with the error information, and the document will remain in the draft version:

If you have no permission to ignore errors or you do not know how to correct them, click on the create request link. The Support Team will receive your request and help you with populating.
Creating FA Plan Templates
Creating an FA plan for a student requires selecting a template.
An FA plan template can be created on the System Financial Aid Plan Templates page: Financial Aid → Settings → System Financial Aid Plan Templates.
Click the Add button under the System Financial Aid Plan Templates. A new template can be created using the Create new empty template option in the Action field or by copying an existing template using Copy template from other template:
You can also create financial aid plan templates for each group to save time and avoid errors. The new group templates are created based on the existing templates or from scratch. Create a group template using the FA Templates button on the Group "Name": Group Details page:

Note: If for one group you need to create additional templates that slightly differ from each other, create one template first and the additional templates can be created based on the template you have created for that group.
There is an ability to copy multiple templates to multiple groups in GEGI. This can be done on the Group "Name": Financial Aid Plan Templates page. It will save you time when you need to copy similar templates to different groups. Click the Copy to Other Groups button under the Financial Aid Plan Templates panel:

You can see the list of all templates on the Financial Aid Templates panel. Here you can add, delete, and edit the templates.
On the next pop-up panel called Copy Templates to Other Groups, you should select which templates will be copied and which groups they will be copied to:

After the selection, click the Copy button.
If for some reason some templates have not been copied to some of the groups, you will see a message with the list of the groups with the successful copying, and the list of the groups where it failed:

Note: If a template in a group has the same name as the one you are copying, the new template will have a numeral postfix appended: "(1)", "(2)", and so on.
When creating a student‘s FA plan, you may select one of the templates configured for a group. You will still be able to create an individual FA plan or from other templates (not from a group):

Financial Plan PDF Headers
The Financial Plan PDF headers define the section headers used to group payments in the FA Plan PDF. Each payment type can be assigned to a specific header, allowing to separate different award types — such as VA benefits — into dedicated sections.
The Financial Plan PDF Headers list is available at Admin → Lists → Financial Plan PDF Headers. Editing it requires the Manage FA Plan Headers permission.
The list includes the following default headers:
- Grant Scholarships (does not need to be repaid):
- Direct Loans:
- VA:

Each header has the following fields:
- Title — the name of the section as it appears in the FA Plan PDF. Must be unique.
- After — controls the section appearance order in the FA Plan PDF by defining the preceding section.
To change the order of sections in the PDF, update the After field for the relevant headers.

When deleting a header that is assigned to one or more payment types, the user will be prompted to select a replacement header.

To assign a header to a payment type, go to Admin → Charges & Payments → Payments and open the payment type you want to configure.

The Financial Plan PDF Header dropdown is available only for payment types with the FA Plan Award setting enabled. Select the header for the payment type to appear under in the FA Plan PDF.

In the FA Plan PDF, payments are grouped by their assigned header. Each header appears as a separate section with its own table. Sections are displayed in the order defined by the After field in the Financial Plan PDF Headers list.

Note: Sections with no assigned payments or where all assigned payments have zero amounts are not displayed. Payments without an assigned header are not shown in the PDF.