TABLE OF CONTENTS
GEGI provides students with the ability to self-enroll into programs manually.
Self-Enrollment Settings
In the program settings, there is a separate tab for the Self-Enrollment settings that allows to customize the self-enrollment process, approval workflow, and set up the application form fields and required documents:

Main Settings
- Allow Self-Enrollment — Enables students to self-enroll in this program through the public enrollment portal.
- Create Registration Form — Defines whether a Registration Form should be automatically created when a student self-enrolls, or this step should be skipped.
- Create Enrollment Agreement— Defines whether an Enrollment Agreement should be automatically created when a student self-enrolls, or this step should be skipped.
- Documents Upload Timing — Defines whether students are to upload documents before or after completing the payment.
- Approve to ENROLLED Mode — Defines whether students should be automatically approved to ENROLLED status after signing all required documents via E-Sign, or they should remain in the ENROLLING status until manually approved by the admission advisor.
- Self-Enrollment Draft Link Validity, Days — Defines the number of calendar days a saved application resume link remains valid.
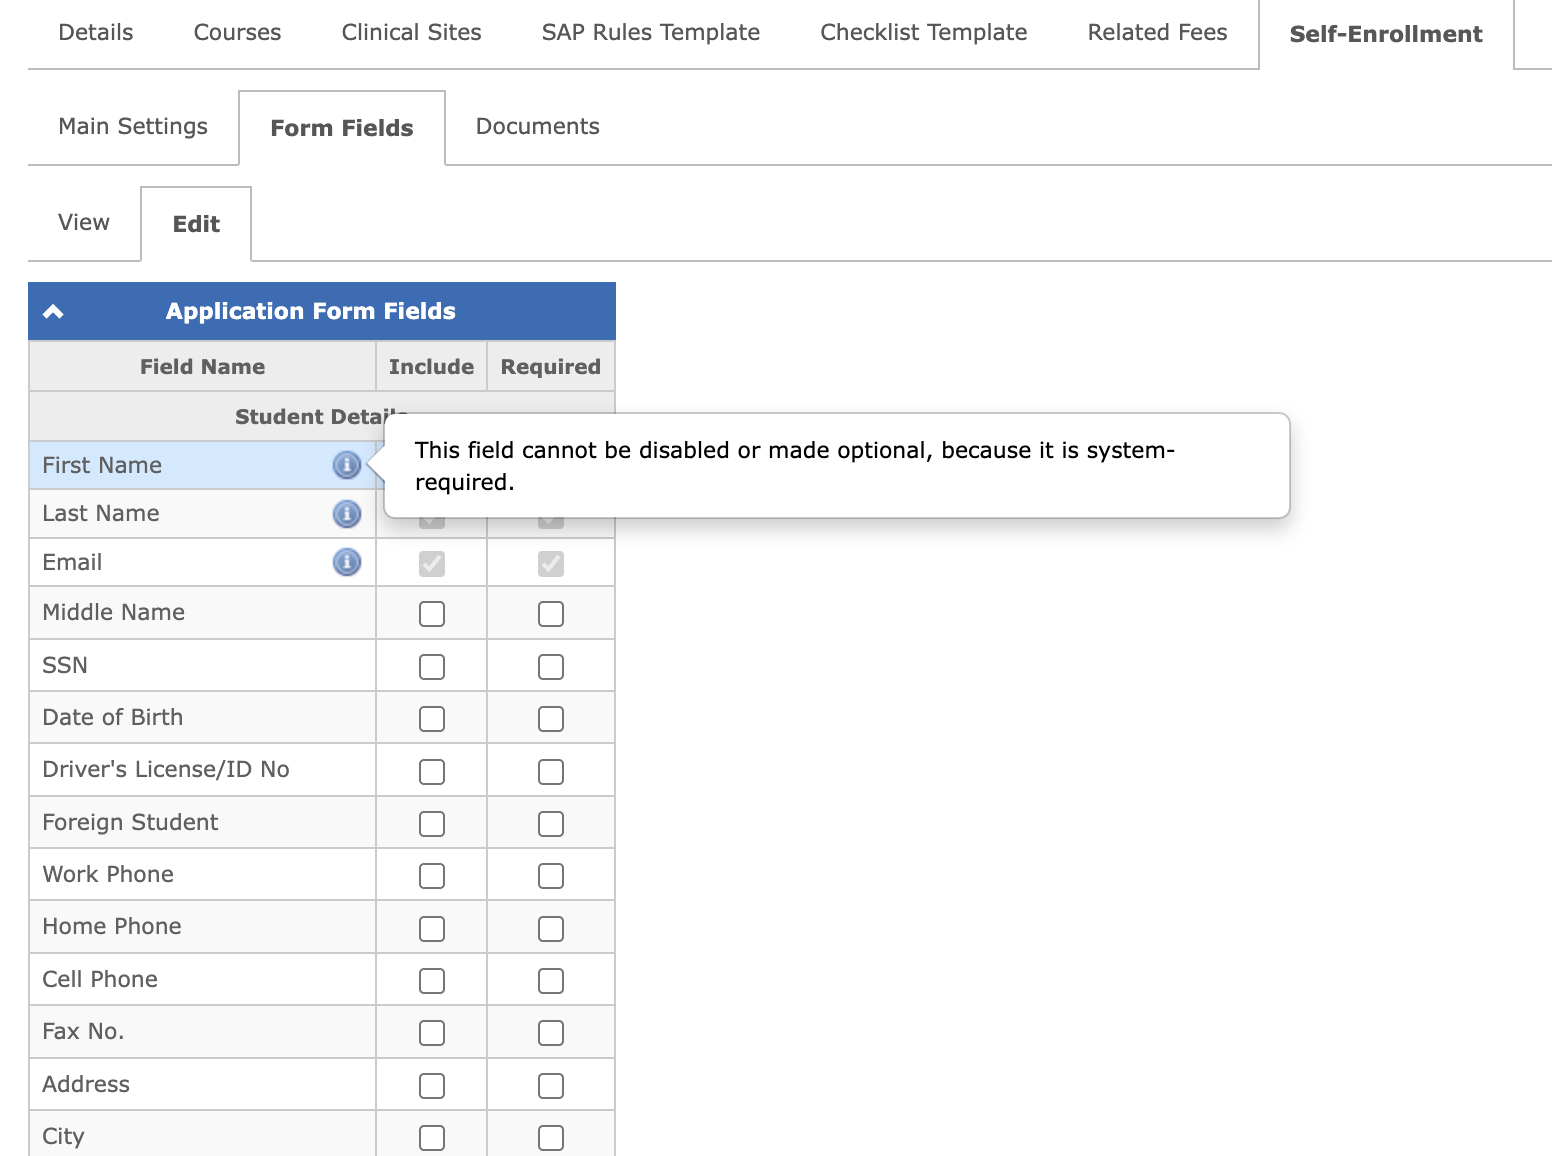
Form Fields
Here you can set up the Application Form fields: define which fields should be included in the form, and which of them are required:
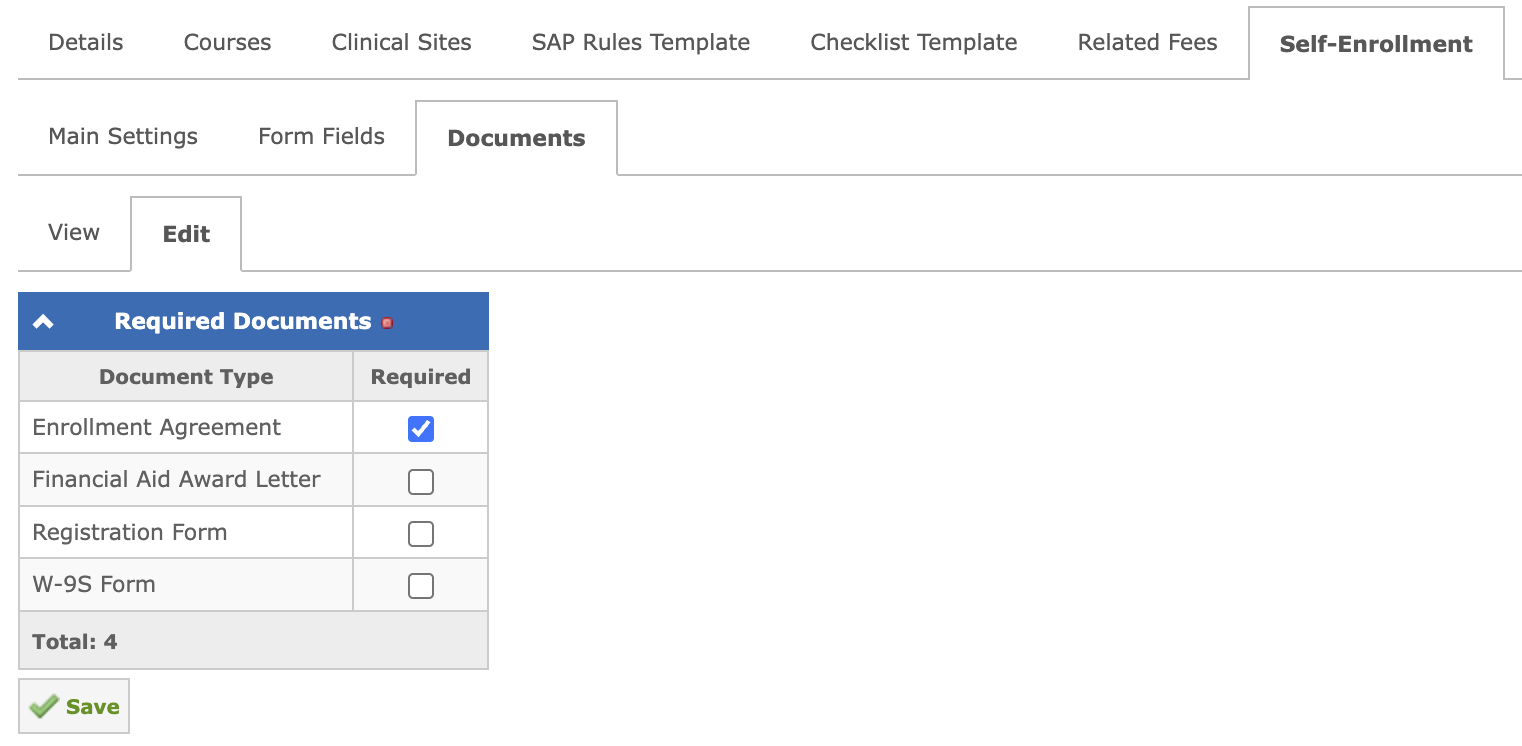
Documents
Here you can set up a list of documents required to submit an application during self-enrollment:
Enable Self-Enrollment for a Group
In the Edit Registration to Group form, the Allow Self-Enrollment checkbox controls whether self-enrollment is available for that specific group on the public enrollment portal:

It is only available when Is Registration Opening is enabled for the group.
The Allow Self-Enrollment checkbox is enabled by default when the program itself allows self-enrollment. Otherwise, it is disabled with a hint that it should first be enabled in the program settings.
When a group has self-enrollment enabled, students selecting it on the Groups Registration page will be directed to the self-enrollment application flow.
Self-Enrollment Application Flow
After selecting a group on the public Groups Registration page, students will land on the Application Form, which consists of the following:
- The Group Details panel at the top showing Campus name, Program name, Group name, Start Date, and Completion Date.
- The Student Fields section dynamically driven by the Form Fields program configuration.
- System-required fields (First Name, Last Name, Email) that are always present and marked as required.
- The optional Notes field (free text).
- The Next or Pay button depending on the program’s Documents Upload Timing setting (if documents are uploaded after payment the Pay button is shown; otherwise — Next).
On the Documents Upload page (when applicable based on the program settings) students will see a list of required documents as configured in the Documents tab of the program’s Self-Enrollment settings. Students can upload a file or delete a previously uploaded one.
Below the form, the Proceed to Payment or Next button is shown depending on the program’s Documents Upload Timing setting.
Duplicate Check
Before the payment form is shown, the system checks whether the applicant matches an existing student profile. A duplicate is detected when:
- The entered SSN matches an existing profile — an exact SSN match is treated as a 100% duplicate, or
- The Full Name (first + last) matches together with the Email, Cell Phone, or Date of Birth.
Depending on the result of the check:
- If no duplicate is found, the student proceeds to the payment form.
- If a single duplicate is found, the payment form is not shown. The message the student sees depends on the matched profile’s stage in the selected group:
- If the student is already REGISTERED (or with at a higher stage) in the group: "You are already registered in this program. Please contact your admission advisor for assistance".
- Otherwise: "The profile matching the information you entered already exists in the system. If this account belongs to you, please log in to continue your enrollment. If you need help, contact your admission advisor."
- If two or more profiles match, the student proceeds to the payment form as if no duplicate were found.
Student Profile Creation
A student profile is created only after a successful payment. This prevents incomplete profiles from appearing in the system when an application is started but never paid for.
After the payment is completed:
- If no duplicate was found, a new student profile is created from the application form data, and the student is added to the selected group and switched to the PENDING stage.
- If a duplicate was found, no new profile is created. The application is linked to the existing profile, and only fields that are empty in the existing profile are filled in from the application — existing values are never overwritten. Then:
- If the student is not yet in the selected group, they are added to it and switched to the PENDING stage.
- If the student is already in the group at the PENDING or REGISTERING stage, the enrollment workflow continues from the current stage.
- If the student is already REGISTERED (or at a higher stage) in the group, no profile changes are applied. The student sees the message: "You are already registered in this program. If you believe this is an error or you were charged twice, please contact your admission advisor." The admission advisor receives an email notification about the duplicate application, so the payment can be reviewed and refunded if necessary.
The duplicate application email is controlled by the notification permission Receive emails about duplicate self-enrollment applications (own students / all students) on the user notification settings page.
Application Review
After all the steps are completed — the application form is filled in, the required documents are uploaded (when applicable), and the payment is made — the student lands on the Application Review page with the message: "Please review all information carefully. You can go back to edit if needed before confirming."
The page consists of the following sections:
- Group Information — Campus, Program, Group Name, Start Date, and Completion Date.
- Student Data — all data from the submitted application form fields. Billing information is not displayed. The Back to Application Form button below the section allows returning to editing the form.
- Uploaded Documents — one row per uploaded document showing the document type and file name. This section is shown only for programs that have a Documents Upload step configured.
- Terms — the required "I certify that all information provided is accurate and complete." checkbox.
The Confirm button remains disabled until the certification checkbox is checked.
Edit Before Confirmation
Before clicking Confirm, students can go back and edit either the submitted application data or the uploaded documents directly from the Application Review page:
- The Back to Application Form button returns to the application form with every field pre-filled with the current data. Next saves the updated data and returns to the Application Review page.
- The Back to Documents button opens the Document Upload step in the edit mode: previously uploaded documents are shown read-only (no option to add or delete), and each document row has an optional Replace field — leaving it empty keeps the current file. Next returns to the Application Review page with the updated document list.
A payment is not requested again when editing — the already completed payment is preserved.
Save and Continue Later
Students can save their progress at any step of the application (Application Form, Documents Upload, Payment, and Review) using the Save and Continue Later button.
On the first click, all entered data and uploaded documents are saved, and a resume link is sent to the student’s email. On subsequent clicks, the progress is saved without re-sending the email.
Clicking the resume link restores the application exactly where the student left off, with all data and documents intact, and allows editing before continuing.
The validity period of the resume link is configured in the Self-Enrollment Draft Link Validity, Days school setting.